Custom report designer
As well as providing you with a selection of pre-defined reports, NetSupport ServiceDesk allows you to create and save your own custom reports. The simple drag and drop interface enables you to build a fully customised report including HTML, text and supporting graphs.
To create a new report
-
Select the Reports tab and click Explore in the toolbar.
-
A Tree view containing the pre-defined report folders will appear and the reports stored within each folder will be listed in the right-hand pane.
-
Click New Report.
-
From the drop-down list, select the saved search that the report will take the data from. You can create a new search by clicking Create Search.
-
Click OK.
-
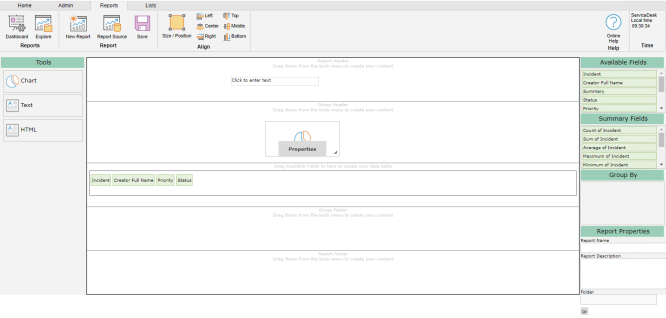
The Design Report window is displayed.
-
To create the structure for the report, drag the required tools from the left-hand side into the header or footer of the report and set the required properties for each tool. The tools available are:
-
To resize and position the tool, select the required tool and click the Size/Position icon in the toolbar. You can also set the alignment by clicking the appropriate icon in the toolbar.
-
To create the data table for the report, drag the required fields from the right-hand side to the available fields section.
-
Once you are happy with the format and you have the required data for your report, enter a report name, description and the folder location.
-
Click Save.
-
The report will now appear in the standard report Tree view under the specified folder. You can run the report from here.
To view a report
-
Select the Reports tab and click Explore in the toolbar.
-
Select the required report folder from the Tree view. All the reports in that folder will be listed in the right-hand pane.
-
Select the required report and click View Report in the toolbar.
-
The report will be displayed in a new tab in your web browser.
To edit a report
-
Select the Reports tab and click Explore in the toolbar.
-
Select the required report folder from the Tree view. All the reports in that folder will be listed in the right-hand pane.
-
Select the required report and click Edit Report in the toolbar.
-
Edit the report as required.
-
Click Save.
 Download manual

