Workflow rules
The Workflow option enables you to automate ServiceDesk processes and allocate work items. Workflow rules can be defined for Incidents, Problems and Change Requests and can be used to perform a set of specified actions when certain conditions are met.
You may decide that simply increasing the priority is sufficient; you could issue an automated email notification to relevant parties, reassign the item, change a value or create a new item.
To create a new workflow rule
-
Select the Admin tab and click the Rules icon in the Workflow section of the toolbar. Any existing rules that you have created are displayed in the Tree view.
-
Click the New Rule icon on the toolbar.
-
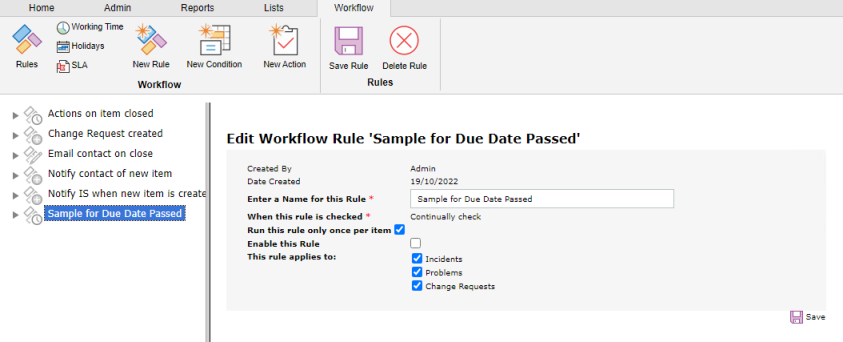
Enter a name for the new rule and choose when you want the rule checked:
Continually check
The rule will be continually checked. You have the option to run this rule once per item.
Note: Sufficient conditions need to be set to stop the rule being reapplied once the action has been taken.Example rule:
Due date passed: A rule is created to increase the priority of the item when the due date has passed. To stop the rule being reapplied, set a condition so the rule will only be run when the item status is open. An action to change the status also needs to be set.
When an item is created
The rule is run when an item is created.
Example rule:
New user: A rule is set up to automatically create and assign items when an Incident is created with a category of New User. Change Requests can be created. For example, one for a new PC and one for a new phone. An Incident can also be created for a user account to be set up and the original Incident status can be set to completed.
When an item is updated
The rule is run every time an item is updated.
Example rule:
Priority Change: A rule can be created so when a priority is changed to high, an email can be sent to the department manager.
-
Decide if you want to enable the rule immediately.
Note: Before enabling the rule, you need to ensure all conditions and actions have been set. -
Select what to apply the rule to:
-
Incidents
-
Problems
-
Change Requests.
-
-
Click Save.
Add a condition to a workflow rule
The conditions available are dependent on the type of rule you are using.
-
Select the workflow rule you wish to apply the condition to.
-
Click the New Condition icon on the toolbar.
-
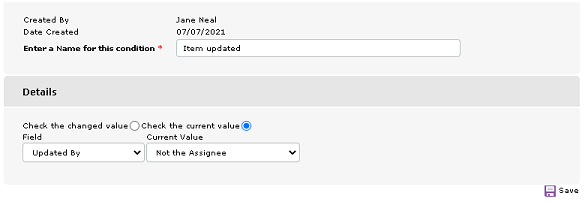
Enter a name for the condition.
-
Select the type of condition from the Field drop-down list, you can select to check the changed value (enter the required old and new values) or check the current value (enter the required value).
Note: If you choose Created by (if the rule is checked when an item is created) or Updated by (if the rule is checked when an item is updated) from the condition field, you have the option to trigger the workflow rule when someone other than the current assignee or contact creates or updates an item. Select either Not the Assignee or Not the Contact from the Current Value drop-down list. -
Click Save.
Applying condition criteria
You can choose the conditions and criteria that must be met for the action to be performed.
-
Select the required workflow rule and click Conditions in the Tree view.
-
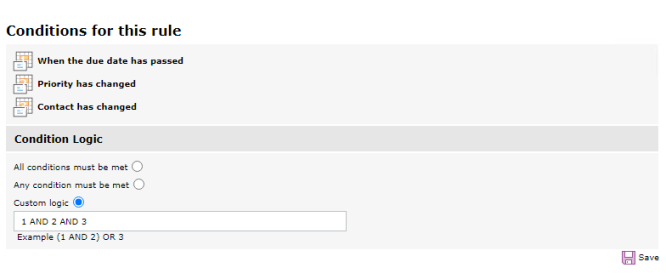
All conditions for this rule will be listed and numbered.
-
Select the criteria:
All conditions must be met
All conditions must be met before an action is performed.
Any condition must be met
Any of the listed conditions can be met for the action to be performed.
Custom logic
Allows you to specify how you want the conditions to be met before an action is performed. For example, if you entered (1 AND 2) OR 3 OR 4, condition 1 and 2 must be met OR condition 3 or 4 must be met.
-
Click Save.
Add an action to a workflow rule
-
Select the workflow rule that you wish to add the action to.
-
Click the New Action icon on the toolbar.
-
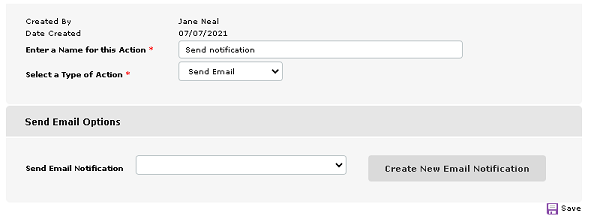
Enter a name for the new action.
-
Select the type of action. You can set or increase the priority, issue an automated email notification, reassign the item, change a value or create a new item.
Note: When reassigning items, you can reassign to a specific person, or you can reassign to the following related users: the person who created the item (or their manager), the contact of the item (or their manager), the person who last updated the item (or their manager) or the current assignee's manager. -
Enter the required properties for the action you have selected.
-
Click Save.
 Download manual

